thickeners

Transglutaminases are a family of enzymes (EC 2.3.2.13) that catalyze the formation of a covalent bond between a free amine group (e.g., protein- or peptide-bound lysine) and the gamma-carboxamide group of protein– or peptide-bound glutamine. Bonds formed by transglutaminase exhibit high resistance to proteolytic degradation.

Transglutaminases were first described in 1959.[1] The exact biochemical activity of transglutaminases was discovered in blood coagulation protein factor XIII in 1968


Thickening agents, or thickeners, is the term applied to substances which increase the viscosity of a solution or liquid/solid mixture without substantially modifying its other properties; although most frequently applied to foods where the target property is taste, the term also is applicable to paints, inks, explosives, etc. Thickeners may also improve the suspension of other ingredients or emulsions which increases the stability of the product. Thickening agents are often regulated as food additives and as cosmetics and personal hygiene product ingredients. Some thickening agents are gelling agents, forming a gel, dissolving in the liquid phase as a colloid mixture that forms a weakly cohesive internal structure. Others act as mechanical thixotropic additives with discrete particles adhering or interlocking to resist strain.

Food thickeners frequently are based on either Polysaccharides (starches, vegetable gums, and pectin), or proteins. A flavorless powdered starch used for this purpose is a fecula (from the Latin faecula, diminutive of faex meaning “dregs”). This category includes starches as arrowroot, cornstarch, katakuri starch, potato starch, sago, tapioca and their starch derivatives. Vegetable gums used as food thickeners include alginin, guar gum, locust bean gum, and xanthan gum. Proteins used as food thickeners include collagen, egg whites, furcellaran, and gelatin. Sugars include agar and carrageenan. Other thickening agents act on the proteins already present in a food. One example is sodium pyrophosphate, which acts on casein in milk during the preparation of instant pudding.
Different thickeners may be more or less suitable in a given application, due to differences in taste, clarity, and their responses to chemical and physical conditions. For example, for acidic foods, arrowroot is a better choice than cornstarch, which loses thickening potency in acidic mixtures. At (acidic) pH levels below 4.5, guar gum has sharply reduced aqueous solubility, thus also reducing its thickening capability. If the food is to be frozen, tapioca or arrowroot are preferable over cornstarch, which becomes spongy when frozen.
Many other food ingredients are used as thickeners, usually in the final stages of preparation of specific foods. These thickeners have a flavor and are not markedly stable, thus are not suitable for general use. However, they are very convenient and effective, and hence are widely used.
Functional flours are produced from specific cereal variety (wheat, maize, rice or other) conjugated to specific heat treatment able to increase stability, consistency and general functionalities. These functional flours are resistance to industrial stresses such as acidic pH, sterilisation, freeze conditions, and can help food industries to formulate with natural ingredients. For the final consumer, these ingredients are more accepted because they are shown as “flour” in the ingredient list.
Flour is often used for thickening gravies, gumbos, and stews. It must be cooked in thoroughly to avoid the taste of uncooked flour. Roux, a mixture of flour and fat (usually butter) cooked into a paste, is used for gravies, sauces and stews. Cereal grains (oatmeal, couscous, farina, etc.) are used to thicken soups. Yogurt is popular in Eastern Europe and Middle East for thickening soups. Soups can also be thickened by adding grated starchy vegetables before cooking, though these will add their own flavour. Tomato puree also adds thickness as well as flavour. Egg yolks are a traditional sauce thickener in professional cooking; they have rich flavor and offer a velvety smooth texture but achieve the desired thickening effect only in a narrow temperature range. Overheating easily ruins such a sauce, which can make egg yolk difficult to use as a thickener for amateur cooks. Other thickeners used by cooks are nuts (including rehan) or glaces made of meat or fish.
Many thickening agents require extra care in cooking. Some starches lose their thickening quality when cooked for too long or at too high a temperature; on the other hand, cooking starches too short or not hot enough might lead to an unpleasant starchy taste or cause water to seep out of the finished product after cooling. Also, higher viscosity causes foods to burn more easily during cooking. As an alternative to adding more thickener, recipes may call for reduction of the food’s water content by lengthy simmering. When cooking, it is generally better to add thickener cautiously; if over-thickened, more water may be added but loss of flavour and texture may result.
Gelling agents are food additives used to thicken and stabilize various foods, like jellies, desserts and candies. The agents provide the foods with texture through formation of a gel. Some stabilizers and thickening agents are gelling agents.
Typical gelling agents include natural gums, starches, pectins, agar-agar and gelatin. Often they are based on polysaccharides or proteins.
Examples are:

Commercial jellies used in East Asian cuisines include the glucomannan polysaccharide gum used to make “lychee cups” from the konjac plant, and aiyu or ice jelly from the Ficus pumila climbing fig plant.
Food thickening can be important for people facing medical issues with chewing or swallowing, as foods with a thicker consistency can reduce the chances of choking, or of inhalation of liquids or food particles, which can lead to aspiration pneumonia.

Maillard reaction

The Maillard reaction (/mˈjɑr/my-YAR; French pronunciation: [majaʁ]) is a form of nonenzymatic browning. It results from a chemical reaction between an amino acid and a reducing sugar, usually requiring heat.

Vitally important in the preparation or presentation of many types of food, it is named after chemist Louis-Camille Maillard, who first described it in 1912 while attempting to reproduce biological protein synthesis.[1](p79)

The reactive carbonyl group of the sugar reacts with the nucleophilic amino group of the amino acid, and forms a complex mixture of poorly-characterized molecules responsible for a range of odors and flavors. This process is accelerated in an alkaline environment, as the amino groups are deprotonated and, hence, have an increased nucleophilicity. The type of the amino acid determines the resulting flavor. This reaction is the basis of the flavoring industry. At high temperatures, acrylamide can be formed.
In the process, hundreds of different flavor compounds are created. These compounds, in turn, break down to form yet more new flavor compounds, and so on. Each type of food has a very distinctive set of flavor compounds that are formed during the Maillard reaction. It is these same compounds flavor scientists have used over the years to make reaction flavors.

the sugar content of an aqueous solution

Degrees Brix (symbol °Bx) is the sugar content of an aqueous solution. One degree Brix is 1 gram of sucrose in 100 grams of solution and represents the strength of the solution as percentage by weight (% w/w) (strictly speaking, by mass). If the solution contains dissolved solids other than pure sucrose, then the °Bx is only approximate the dissolved solid content. The °Bx is traditionally used in the wine, sugar, fruit juice, and honey industries.

Comparable scales for indicating sucrose content are the degree Plato (°P), which is widely used by the brewing industry, and the degree Balling, which is the oldest of the three systems and therefore mostly found in older textbooks, but also still in use in some parts of the world.[1]

A sucrose solution with an apparent specific gravity (20°/20°C) of 1.040 would be 9.99325 °Bx or 9.99359 °P while the representative sugar body, the International Commission for Uniform Methods of Sugar Analysis (ICUMSA), in favor of mass fraction, would report the solution strength as 9.99249%. Because the differences between the systems are of little practical significance (the differences are less than the precision of the instruments) and wide historical use of the Brix unit, modern instruments calculate mass fraction using ICUMSA official formulas but report the result as °Bx.

low heat cooking

Sous-Vide 101: Low-Temperature Chicken
J. Kenji López-Alt

There is a misconception about food safety, and particularly as it applies to low-temperature water bath cooking (often inaccurately referred to as “sous-vide” cooking*). The thought process goes something like this:

*Sous-vide refers only to the vacuum-packing aspect, which, while it often goes hand in hand with low-temp water baths, it is not the defining characteristic of the cooking technique.

Point 1: Industry-standard food safety instructions refer to the range between 40°F and 140°F as the bacterial “danger zone,” and recommend not allowing any foods to sit within that range for any longer than four hours.

Point 2: Low-temperature cooking often takes place in temperature ranges within this “danger zone.” For example, cooking a steak for several hours at 130°F.

Conclusion: Low-temperature cooking is unsafe.

It seems reasonable to make such an assumption, but it ignores one important factor: industry standards for food safety are designed to be simple to understand at the expense of accuracy. The rules are set up such that anybody from a turn-and-burner at Applebee’s to the fry-dunker at McDonald’s can grasp them, ensuring safety across the board.

But for single-celled organisms, bacteria are surprisingly complex, and despite what any ServSafe chart might have you believe, they refuse to be categorized into a step function. A number of factors, including saltiness, sweetness, moisture, and fat content can affect growth, not to mention the effects of temperature are much more subtle.

For instance, take a look at the graph below. The data was taken directly from the USDA’s guide to obtaining a 7.0 log10 relative reduction in salmonella in chicken. For those of you who don’t know what a 7.0 log10 relative reduction is, it’s the bacterial equivalent of sticking a stick of dynamite in an anthill. The vast majority of the baddies become harmless, dead, ex-baddies.

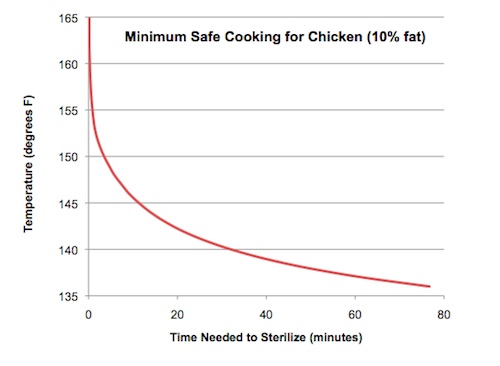
Essentially, the red line in this graph indicates how long a piece of chicken needs to be cooked at a specific temperature in order to be deemed safe for consumption. So, for example, we see that at 165°F, the chicken is safe pretty much instantaneously (hence the 165°F minimum internal temperature recommendation by the USDA—they are being very conservative and assuming you will bite into it the second it reaches that temp). Whereas at 140°F, the chicken needs to be held for 35 minutes to be safe.

Now with a conventional oven, this chart is totally useless. Since your cooking environment is much higher than your desired final temperature there is no way to hold your meat at a steady low temperature—it hits 140°F, then continues to go up and up and up. So the best you can do is take the center to 165°F to ensure that the entire piece of chicken is safe to consume, by which point it’s already expelled a great deal of its moisture.

Low-temperature cooking changes all of that. With a temperature-controlled water bath, you have the ability to not only cook chicken to lower temperatures, but more importantly, to hold it there until it’s completely safe to consume.

While the recipe that follows is easiest with a controlled water bath, feel free to use my cheap and easy cooler hack to do it ghetto-style.

Continue here for Sous-Vide Chicken with Sun-Dried Tomato Vinaigrette »


Even though a cooler is designed to keep things cool, there’s no reason why it shouldn’t perform equally well at keeping hot things hot, right? The principles are the same—the interior of the cooler is separated from the outside environment with two layers of plastic with a vacuum in between them. Heat transfer is minimized, thus any volume of hot water inside the cooler should stay hot for a long, long time. That’s pretty exciting.

The other part of precision low-temperature cooking is vacuum sealing the food. This is necessary primarily because when placed in the water bath, any air bubbles left in the bag will insulate the food within, causing uneven cooking. That said, the strong vacuum provided by a commercial chamber vac or a food saver are completely unnecessary for most cooking applications. In fact, the only thing you need to do is ensure that your cooking bag has no bubbles in it.

Thanks to a tip I gleaned a couple of weeks ago from Dave Arnold of the French Culinary Institute, achieving this is a snap. It uses the simple property of displacement. All you have to do is place your food in a regular zipper-lock bag, seal the zipper most of the way, then slowly dip it into a large volume of water, keeping the zipper-lock end above the water line.

As you submerge it, air should be steadily squeezed out (sometimes a little coaxing is necessary), and the bag will conform to the shape of its contents. Once you get the the very top, seal the bag, and there you go: food sealed in a perfectly air-free environment.


Hard pressed office worker and cook here. If I go home at lunchtime and put in a medium sized chicken to roast in the oven can I ensure it’s ready to eat when the family get in in the evening?

I’ve found a recipe instructing me to roast at 120C for 5 hours, uncovered. The recipe mentions ensuring it reaches 85C internally.

Does that sound reasonable? Any other tips to ensure I don’t risk a charred/undercooked bird?

A few days ago I printed out a recipe from peacefulnightdove “BEST Slow-Roasted Chicken”. It sounded wonderful but was to be roasted at 250 F (126 C) degrees for 5 hours. That sounded like a low temperature to me, so I emailed the County Nutritionist and Health Agent where I lived. Here is her reply: Good for you JoAnn to be suspicious! That is definitely outside the USDA guidelines, and yes bacteria may well be growing for quite a while in there. Poultry especially should not be done at less than 325 degrees. You could use the same spices and onions, increase the temp to 325 and decrease the time. Figure about 20 min per pound for the time. The safest way is to use a meat thermometer, final temp in the thigh should be 180 degrees. http://community.tasteofhome.com/forums/t/173823.aspx


Staying with old friends over the weekend, and on Sunday, my hostess – who is a great cook – asked would I mind if she did something simple for dinner, a roast chicken.

Since it’s possibly my fav dish, I agreed heartily, and she immediately got to work and switched on the oven. It was only mid-afternoon, and I asked what time she planned to have dinner at.

‘Oh the chicken will be done about 7.00, so we’ll eat shortly after that’. That meant a three-hour cooking time!

I asked her what temperature she was cooking the chicken at and she told me 300F, which I scarcely believed. ‘Well, I don’t like it all dried out, and I like it really falling off the bone, so I like to cook it slowly’.

Of course we debated the pros and cons of high versus low temperature. I was intrigued by the idea of a slow roasted chicken, how it would taste, and whether it really wouldn’t be dried out.

Here’s what she did:

4lb chicken
sprinkled liberally with sea salt, and herbes de provence
No trussing, and nothing in the cavity
Covered generously with thick-cut canadian bacon on the breast

Before putting it in the oven, she put a foil tent over the breast, which she removed about half an hour before taking the chicken out.

The result was one of the most delicious, moist, and tender roast chickens I have ever eaten. It made me think a lot about the 450F oven I use for mine (which is really closer to a true 430F).


Roast Sticky Chicken-Rotisserie Style

Ingredients

4 teaspoons salt
2 teaspoons paprika
1 teaspoon onion powder
1 teaspoon dried thyme
1 teaspoon white pepper
1/2 teaspoon cayenne pepper
1/2 teaspoon black pepper
1/2 teaspoon garlic powder
2 onions, quartered
2 (4 pound) whole chickens

Directions

In a small bowl, mix together salt, paprika, onion powder, thyme, white pepper, black pepper, cayenne pepper, and garlic powder. Remove and discard giblets from chicken. Rinse chicken cavity, and pat dry with paper towel. Rub each chicken inside and out with spice mixture. Place 1 onion into the cavity of each chicken. Place chickens in a resealable bag or double wrap with plastic wrap. Refrigerate overnight, or at least 4 to 6 hours.
Preheat oven to 250 degrees F (120 degrees C).
Place chickens in a roasting pan. Bake uncovered for 5 hours, to a minimum internal temperature of 180 degrees F (85 degrees C). Let the chickens stand for 10 minutes before carving.


Uncle Ben got it right a few decades ago when he put his rice in little plastic bags and said to boil them up just like that.

The results were, for many American home cooks, just dandy, with fluffy rice every time. No hassle of measuring or cleaning up a dirty pan.

Then along comes something called “sous vide” — literally translated as “under vacuum” — a few decades later. This means food is cooked in Cryovac plastic containers from which the air has been completely removed. Then the bag is placed in a water bath and cooked at a low temperature for a long time.

Simmering just below the surface of this technique, however, is the question of bacterial growth from cooking and reheating at lower temperatures than recommended by some state and federal authorities.

Still, there are chefs and experts who believe the system is safe and results in more sumptuous, tender and nutritious meals.

David Ritter, 50, of Westfield — a chef instructor at The Art Institute of New York City — wholeheartedly believes in the technique and its safety.


I tend to get caught up on certain cook book authors, and for the past month it has been all about Heston Blumenthal. Head chef at the Fat Duck in the U.K., his cookbook In Search of Perfection has been fostering idea after crazy idea. In a Serious Eats article, we wrote about cooking a pizza on the bottom of a cast iron skillet, to great success. The best part is that his mad-cap search for perfection is, except for a few mentions of blowtorches, essentially plausible at home. That’s when I came to the roast chicken section.

A raw chicken is about 80 per cent water. Cooking it is basically a battle to hang on to some of that moisture, so that you end up with a deliciously succulent bird. In this recipe, two techniques help achieve that aim: brining and low-temperature cooking.

Brining is something I’ve tried before and completely recommend. But how low is the low-temperature cooking? I’d just done that a few months ago at 250 degrees. But apparently that wasn’t even close to what Heston wanted. The bird is done at 140, so he said to set the temperature there and cook it for a long time. Here’s the idea: the bird is supposed to be done cooking when it reaches 140. So put it in environment at that temperature, and wait until it gets there.

It might sound all well and good, but that’s a good 60 degrees below where my oven can go. I thought I was going to have to forget it until I came across the one instrument that I’d never considered before. The crock-pot. Here was something specifically designed to cook foods for a long time at a low temperature. Would it work?

The “hot” setting was way too hot, and even “low” maintained a temperature far above what I needed. So then I had to turn to the “keep warm” setting–you know, the one your turn to after the food is done. And like some destined fate, when I tested the temperature of the setting it came out exactly to 140. It was time to start.

Problems started immediately thereafter. Heston likes to plunge his bird in boiling water for 30 seconds to help get a crisper skin, the same method that helps those ducks in Chinatown windows look so crackly. But I haven’t a pot near that big. My biggest one would quickly lose it’s boil if I stuck a three and half pound bird in. I also didn’t brine the bird. It’s a hassle, and I wanted to see what this method would be like with just the slow cooking.

The biggest problem, however, was how Heston wanted to cook the skin. After the bird had cooked for 5 hours, the skin looks pale and gross, and needs some really high heat to make it look appetizing, not to mention crackly and tasty, the whole point of roast chicken. He advised letting it sit for an hour, and then sauteing the whole thing in a very hot pan to crisp the skin. Unfortunately, sauteing a whole bird is about as easy as it sounds, and no where near comprehensive. Blotches of burned skin appear next to untouched flesh. I don’t doubt that it can be done, but it’s really hard and not worth it. The pan was so hot the oil splattered violently when the chicken went in. I had to use a pan top as a shield to protect my own skin. It could not have gone worse.

But the meat? Absolute perfection. It was without a doubt the best chicken flavor I’d ever achieved. It was juicy, full flavored, and weirdly rich. After 5 hours in the crock pot I expected there to be all these juices floating in the bottom, but there was maybe a tablespoon–they all stay in the bird. He says that you can’t even make a sauce out of the drippings because there won’t be enough. He thinks it’s better to have a chicken full of those juices. I happen to agree with him.

Braising

Braising (from the French “braiser”) is a combination cooking method using both moist and dry heat; typically the food is first seared at a high temperature and then finished in a covered pot with a variable amount of liquid, resulting in a particular flavor. Braising of meat is often referred to as pot roasting, though some authors make a distinction between the two methods based on whether additional liquid is added.

Most braises follow the same basic steps. The food to be braised (meat, poultry, but also vegetables or mushrooms) is first seared to brown its surface and enhance its flavor (through a process known as the Maillard reaction). If the food will not produce enough liquid of its own, a small amount of cooking liquid that often includes an acidic element, such as tomatoes, beer, or wine, is added to the pot, often with stock. The dish is cooked covered at a very low simmer until the meat is fork tender. Often the cooking liquid is finished to create a sauce or gravy.[3][4]

Sometimes foods with high water content (particularly vegetables) can be cooked in their own juices and no extra liquid is required.[5]

A successful braise intermingles the flavours of the foods being cooked and the cooking liquid. This cooking method dissolves collagen from the meat into gelatin, to enrich and add body to the liquid. Braising is economical, as it allows the use of tough and inexpensive cuts, and efficient, as it often employs a single pot to cook an entire meal.

Long before cooks had ovens, they had braising. They would suspend a heavy, covered pot over a hearth fire or open grate in the kitchen and slowly cook, or braise, their food. Sometimes they stacked embers from the fire on the lid, to provide both upper and lower sources of heat. Inside, a little liquid formed a sauce, as meats and vegetables cooked. This method of cooking yields delicious dishes with considerable character, explaining why you can still find many fine recipes that call for braising.

Think carbonnade, pot roast, fricassee, stew, or daube. While all these dishes are variations on braising, most are more complex than those enjoyed by our ancestors. Though the success of their execution relies on similar principles: browning, moist heat, lengthy cooking in a closed vessel, and simmering temperatures.

A traditional braising pot holds heat well and has a tight-fitting lid. Ideally, it should be about the same size as the dish being prepared. Too much space between the ingredients and the lid allows steam to condense and drip from the lid’s underside onto the ingredients, diluting the rich sauce.
Most braises call for the tougher cuts of meats or poultry. In beef, this means cuts such as chuck, flank, brisket, rump, and round. These cuts come from areas of the animal that are continually exercised, which allows the muscle tissues to develop more flavor extractives as well as strength.

Usually, braising recipes begin by browning the meat in a little oil. If you’re using small pieces of meat, as in a stew, brown in batches, so the meat doesn’t steam. The temperature must be high enough to trigger the browning process. Contrary to popular opinion, browning, or searing, the surface does not seal in meat’s juices. It does, however, produce new and complex flavor compounds as the sugars and proteins in the meat react under high temperatures and the surface color deepens. This browning reaction is known as the Maillard reaction. 


While collagen softens in moist heat, muscle fibers firm as their proteins unfold and form new linkages during cooking. (add link to this part of the “meat” section, please). Various proteins in meat fibers coagulate over a range of temperatures from 105 F/40 C to 195 F /90 C‹temperatures that are far below boiling point (212 °F/100 °C).

The higher the cooking temperature, the tougher the muscle fibers become, and the more they shrink in both length and width. It’s no wonder that stewing beef becomes incredibly chewy when cooked in a boiling broth! If you are accustomed to boiling your braises, try reducing the temperature to a gentle simmer and let us know if you notice a difference in tenderness.

To keep meat tender yet safe during braising, you must maintain an important balance. Cooking temperatures must be high enough to kill microorganisms, yet not so high that the meat toughens. Use a thermometer to check the temperature of the surrounding stock and keep it at a simmer of 180 F/82 C-190 °F/88 °C.